
- 1. Why Clean Your Cat's Ears?
- 2. How to Tell If Your Cat Needs Ear Cleaning
- 3. Tools You’ll Need to Clean Your Cat’s Ears
- 4. Step-by-Step Guide to Cleaning Your Cat’s Ears
- 5. Common Mistakes to Avoid When Cleaning Your Cat’s Ears
- 6. When to Take Your Cat to the Vet for Ear Issues
1. Why Clean Your Cat's Ears?
Ear cleaning is an essential part of your cat's overall grooming and health routine. Cats are prone to ear infections, especially if they have long ears or spend a lot of time outdoors. Regular ear cleaning helps to prevent wax buildup, infections, and other ear-related problems that could lead to discomfort for your furry friend. It also helps you monitor the health of your cat's ears, ensuring that you catch potential issues early.
2. How to Tell If Your Cat Needs Ear Cleaning
While ear cleaning should be part of regular cat care, it’s important to know when your cat needs extra attention. Here are a few signs that it might be time for a cleaning:
2.1. Visible Dirt or Wax Buildup
If you notice dark, waxy buildup in your cat's ears, it's a good sign that they need to be cleaned. Regular cleaning helps prevent this buildup from turning into an infection.
2.2. Odor
If your cat's ears start to emit a strong odor, it could indicate that bacteria or yeast are present. This is a common sign of an ear infection that may require cleaning and possibly veterinary attention.
2.3. Scratching or Rubbing Ears
If your cat is scratching its ears frequently or rubbing them against furniture, it's usually a sign of irritation or discomfort, possibly caused by excess wax or an infection.
2.4. Head Shaking
Head shaking or tilting could indicate that your cat is trying to relieve discomfort in its ears. This could be a sign that their ears need cleaning or they have an underlying ear problem.
3. Tools You’ll Need to Clean Your Cat’s Ears
Before you start cleaning your cat's ears, make sure you have the right tools. Here’s what you’ll need:
3.1. Ear Cleaning Solution
Use a cat-safe ear cleaning solution. Do not use hydrogen peroxide or alcohol, as these can irritate your cat’s sensitive skin. A gentle, veterinarian-approved ear cleaner is your best option.
3.2. Cotton Balls or Gauze Pads
Cotton balls or gauze pads are ideal for gently wiping away any dirt, wax, or debris from your cat's ears. Avoid using cotton swabs as they can push debris further into the ear canal.
3.3. Towel
Have a towel handy to help keep your cat calm and comfortable during the cleaning process. You can wrap them gently in the towel to prevent them from squirming away.
3.4. Treats
Reward your cat with treats before and after the cleaning session to help them associate ear cleaning with positive experiences.
4. Step-by-Step Guide to Cleaning Your Cat’s Ears
Follow these steps to clean your cat’s ears safely at home:
4.1. Prepare Your Cat
Find a quiet, comfortable space to clean your cat's ears. You may want to enlist help to hold your cat gently while you perform the cleaning. Speak to your cat in a calm voice throughout the process to keep them relaxed.
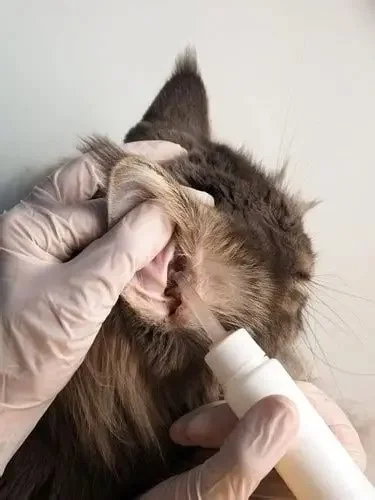
4.2. Apply the Ear Cleaning Solution
Lift your cat’s ear gently and apply a few drops of the ear cleaning solution into the ear canal. Be careful not to touch the inside of the ear with the tip of the bottle. Gently massage the base of the ear to allow the solution to break down the wax and debris.
4.3. Wipe Away Dirt
After massaging the ear, use a cotton ball or gauze pad to wipe away the loosened dirt and wax from the ear. Be gentle and avoid pushing anything too deep into the ear canal.
4.4. Repeat If Necessary
If you see that there is still some buildup, repeat the process with a fresh cotton ball or gauze pad until the ear appears clean.
4.5. Reward Your Cat
After the cleaning is complete, reward your cat with a treat and some affection. This will help them feel more comfortable with future cleaning sessions.
5. Common Mistakes to Avoid When Cleaning Your Cat’s Ears
While ear cleaning is a simple process, there are a few mistakes you should avoid:
5.1. Using Harsh Cleaning Solutions
Never use alcohol, hydrogen peroxide, or other harsh chemicals to clean your cat's ears. These can cause irritation or damage to the sensitive skin inside the ear canal.
5.2. Inserting Objects Into the Ear Canal
Do not insert cotton swabs or other objects deep into your cat’s ear canal. This can cause injury or push debris further inside, leading to potential infections.
5.3. Ignoring Signs of Infection
If you notice persistent symptoms such as swelling, redness, or discharge from the ear, it’s important to consult a veterinarian. These could be signs of an ear infection that requires professional treatment.
6. When to Take Your Cat to the Vet for Ear Issues
If your cat's ears show signs of infection, such as foul-smelling discharge, redness, or excessive scratching, it’s time to see the vet. Infections can sometimes require prescription medication or more intensive care than can be provided at home. A veterinarian can also help if your cat’s ears are showing signs of mites or other conditions.
Cleaning your cat’s ears at home can be an easy and effective way to keep them healthy. By following these simple steps and using the right tools, you can maintain your cat’s ear hygiene and prevent potential problems. For more tips on cat care, visit Brothers Pets and explore our range of cat care products and services.


 Sunny Acre Farm5.0 (1 reviews)
 rororiri5.0 (15 reviews)
 Hewitt Animal Hospital, A Thrive Pet Healthcare Partner4.0 (371 reviews)
 Ulm Veterinary Clinic4.0 (298 reviews)
 Fayette Veterinary Hospital4.0 (665 reviews)
 Red Bud Veterinary Service, PC4.0 (152 reviews)
 Travel Tips for Pets: Keeping Dogs and Cats Comfortable
 Safe Hiking Tips for Dogs and Their Owners - Enjoy Outdoor Adventures Together
 The Ultimate Guide to Safe Dog Toys for Chewers
 The Dos and Don’ts of Pet Health Every Owner Should Know
 Tips for Teaching Puppies Basic Commands at Home: A Beginner's Guide
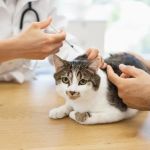 The Role of Vaccines in Preventing Pet Illnesses: Essential Guide for U.S. Pet Owners