
Pet Nail Trimming: A Safer Step-by-Step Checklist
On this page
- Quick answer
- Why nail length matters
- Know when a trim is due
- Prepare the pet, tools, and space
- Trim one small step at a time
- Approach dark nails carefully
- Respond if a nail bleeds
- Choose when to get professional help
- Nail-trimming checklist
- Limitations and important notes
- Sources and evidence notes
- Frequently asked questions
- Conclusion and next steps
Quick answer
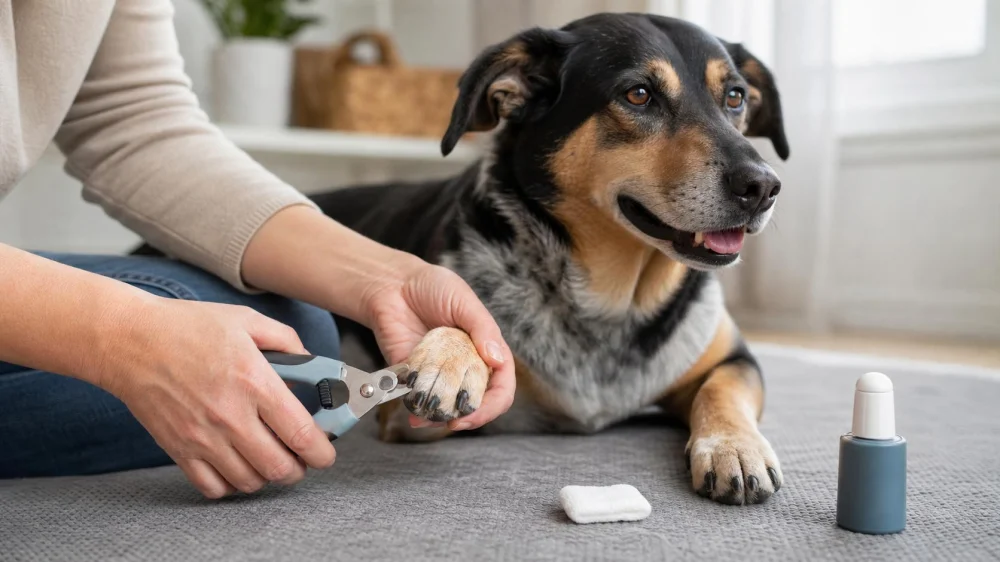
Trim pet nails only when your animal is calm and you can clearly control the paw without force. Use species-appropriate, sharp tools, remove a very small amount at a time, and avoid the sensitive quick inside each nail. Keep a pet-safe clotting product ready, stop if the pet struggles, and seek veterinary help for injury, pain, or abnormal nails.
Why nail length matters
Nail trimming is the controlled removal of excess claw length without cutting the living tissue called the quick. The quick contains blood vessels and nerves, so cutting into it causes pain and bleeding.
Overgrown nails may catch on fabric, change how a pet places a paw, or curl toward the pad. Length is not the only issue: cracked, split, thickened, discolored, or misshapen nails can reflect trauma or disease and deserve closer assessment.
This guide is general preparation for dog, cat, and other companion-animal owners in the United States. Species, age, anatomy, health, behavior, and medication can change what is safe. Follow your veterinarian’s advice and the instructions supplied with the grooming tool.
Know when a trim is due
There is no universal calendar. Nail growth, exercise surface, body weight, gait, and which nails contact the ground all affect the interval. Dewclaws often receive little natural wear and can become overgrown even when other nails look short.
Check every paw in good light. Look from the side and underside without forcing joints. A veterinarian or experienced groomer can demonstrate an appropriate target length for the individual pet. Do not rely only on clicking sounds on hard floors; floor type and gait can make that clue unreliable.
Prepare the pet, tools, and space
- Choose the tool. Use a clipper or grinder designed for the pet’s species and nail size. Blunt or poorly sized clippers can crush or split a nail.
- Check the tool. Confirm the blade is sharp, parts are secure, and a grinder works normally before bringing the pet into position.
- Prepare for bleeding. Keep a pet-safe styptic product and clean gauze within reach. Read the product directions in advance.
- Create stable footing. Use a quiet, well-lit area with a nonslip surface and no need to stretch across the pet.
- Introduce handling gradually. Practice brief paw touches, gentle toe separation, tool sounds, and rewards on separate occasions when needed.
- Get help appropriately. A second calm adult may offer treats or support the body, but should not pin a panicking animal down.
For cats and small animals, species-specific handling matters. Do not copy a restraint technique intended for a different animal. If the pet has previously bitten, scratched, fainted, or become severely distressed during nail care, ask a veterinarian for a safer plan before trying at home.
Trim one small step at a time
- Let the pet settle on secure footing and keep the session short.
- Hold one paw gently without twisting the leg or squeezing painful joints.
- Part fur so the full nail and surrounding skin are visible.
- Identify the free tip and the likely location of the quick.
- Position the clipper so it cuts cleanly rather than crushing from the side.
- Remove only a thin slice from the tip.
- Inspect the cut surface before deciding whether to take another small slice.
- Reward calm behavior and release the paw between nails as needed.
- Stop while the pet is still coping; finishing every nail in one session is not required.
With a grinder, use brief touches and monitor heat. Long contact can warm the nail and cause discomfort. Keep fur away from rotating parts, protect eyes from dust, and follow the device maker’s safety instructions.
Approach dark nails carefully
The quick is easier to see through some light-colored nails and difficult or impossible to see through dark nails. On a dark nail, take very small slices and inspect the center after each cut. A change in the central texture or color can warn that living tissue is close, but visual cues vary and are not a guarantee.
If you cannot confidently identify a safe stopping point, leave the nail longer and ask a veterinarian or groomer to demonstrate. Trying to reach an ideal length in one session increases risk, especially when the quick has extended with long-term overgrowth.
Respond if a nail bleeds
Stay calm, stop trimming, and apply the pet-safe clotting product and gentle direct pressure according to product or veterinary guidance. Prevent the pet from licking or running while you monitor the nail. Do not apply an unapproved household chemical to the wound.
Contact a veterinary clinic promptly if bleeding is heavy, does not stop with appropriate first aid, restarts repeatedly, or occurs in a pet with a known bleeding disorder or medication that affects clotting. Seek care for a torn nail, exposed tissue, severe pain, weakness, pale gums, or any other concerning change.
Choose when to get professional help
Professional care is best when the pet cannot be handled without significant fear or force, the nail is embedded in a pad, or there is swelling, discharge, odor, deformity, suspected infection, or a painful injury. Sedatives should be used only when prescribed for that individual pet and exactly as directed.
When comparing veterinary clinics or groomers, ask what species and behavior needs they handle, who performs nail care, how they respond to fear, what restraint methods they use, and when they refer a medical concern. A directory listing or review is a starting point, not proof that a provider is appropriate for a particular animal.
Nail-trimming checklist
- Inspect every nail, including dewclaws
- Use sharp, species-appropriate tools
- Set up bright light and nonslip footing
- Keep gauze and pet-safe clotting product ready
- Handle the paw without twisting or force
- Remove a small amount and inspect each cut
- Monitor grinder heat and keep fur clear
- Pause when stress increases
- Seek veterinary care for injury or abnormal nails
Limitations and important notes
Written guidance cannot show the quick location in an individual nail or assess a pet’s pain, mobility, circulation, skin condition, or behavior. Puppies, senior pets, animals with arthritis, and pets with previous grooming trauma may need a modified approach.
Do not attempt to cut an ingrown nail out of the pad, remove a partly detached nail, or treat suspected infection as routine grooming. These problems can be painful and may require medical cleaning, pain relief, or other veterinary treatment.
Sources and evidence notes
The principles in this guide reflect common veterinary and low-stress grooming practice: prepare before restraint, use suitable equipment, remove small amounts, avoid living tissue, and stop when pain or fear makes the procedure unsafe. For an individual animal, current advice from the treating veterinarian and the grooming-tool manufacturer is more specific than a general article.
Frequently asked questions
Should all four paws be trimmed in one session?
No. A short, calm session with only a few nails can be safer and more useful for training than forcing completion. Record which nails remain and continue later when the pet is relaxed.
Can regular walks replace nail trimming?
Some surfaces wear certain nails, but the effect varies and often misses dewclaws. Check every nail rather than assuming exercise keeps them all at a safe length.
Is a grinder always safer than a clipper?
No. A grinder allows gradual removal but introduces noise, vibration, heat, dust, and a rotating part that can catch fur. The best tool is one that suits the nail, the operator’s control, and the pet’s tolerance.
Can I use human nail clippers?
Human clippers are not shaped for many pet nails and may crush or split thicker claws. Use a tool specifically intended for the pet’s species and nail size unless a veterinarian gives different guidance.
Conclusion and next steps
Inspect the nails first, prepare the correct tools and first-aid supplies, and trim only tiny amounts while the pet remains comfortable. Make “stop early” part of the plan. If the quick is unclear, the pet is highly distressed, or a nail looks injured or abnormal, arrange help from a qualified groomer or veterinary team rather than forcing the trim.



 All The Best Pet Care - Mercer Island4.0 (37 reviews)
 Narra Veterinary Clinic4.0 (77 reviews)
 Thrive Pet Healthcare Specialists - Mansfield3.0 (675 reviews)
 FurryTail Ragdolls Cattery of Eastern Oklahoma5.0 (4 reviews)
 Tipton Veterinary Services4.0 (139 reviews)
 Ridgetop Animal Hospital5.0 (8 reviews)
 Understanding Pet Behavior: Training Tips and Techniques
 How to Support a Dog Recovering from Surgery with Care and Comfort
 Choosing the Right Hypoallergenic Cat Food for Sensitive Stomachs
 How to Safely Transition Your Pet to a New Food Brand – Expert Tips
 How to Prevent and Treat Flea Infestations in Cats | Essential Tips
 Pet Food Labels: Find the Facts That Guide Daily Feeding